Arsenal
No soldier goes to battle without weapons, and as artists we should have an arsenal at our disposal too, especially when it comes to jobs with tight deadlines. And thanks to modern day technology, we have a whole arsenal to choose from!
However, don't forget, the soldier's expertise is what matters the most, not the weapon itself. The weapon is harmless without its master. So don’t get fooled; no amount of technology will ever replace actual knowledge and experience. You must have at least a decent understanding of the fundamentals and principles. Aid your work with extra tools if you are confident, you can do just fine without them, but you need to cut the production time.
The list below is meant to speed up productivity in a quality way, preserving genuinity. So let’s see them!
Brushes
Textured brushes, like clouds and vegetation, are meant to quickly put down patterns and textures, but you have to be careful how much you utilise them, as overusing such brushes could result in funky looking pictures.
Works best for concept artists, whose work is to be an idea factory, and they don’t have to bring the concept to splash art quality. Their work is all about quickly communicating a tirade of ideas.
Illustrators, like me, lay down some textures and over paint them to make them more organic. This is only possible if you know what you are doing. No brush will save a bad composition, a botched value system or incorrect anatomy.
This section is valid for photobashing as well, and using photo textures. Keep it balanced and reasonable.
Sidenote:
“What brushes do you use?” - the notorious question under every painting/drawing demonstration. The correct answer would be: doesn’t fudging matter!
My experience is when I was a brush hoarder, it did not really enhance my paintings at all, no matter how fancy those brushes were. I did not have the right experience to make them work for me. Also, brushes behave differently in different artists’ hands. Think about handwriting - how distinct and unique for every individual. I believe brushes, traditional and digital alike, work the same way.
Don’t over stress about brushes. You are unique, so should be your art and brushstrokes.
References
I cringe every time when someone yells at artists: you using reference?! Cheater! Well, not really. Our brain is not an accurate storage hard drive, and has a tendency to remember incorrectly, or thwart the stored info. Just think about all those UFO sightings, or last Christmas.
How can I trust that squishy mush in my head to accurately remember a hand in 360 degrees, and in every possible pose and gesture? I don’t. And for centuries, no artist did.
Leonardo Da Vinci paid for body snatchers to bring him cadavers for his anatomic and pathologic studies. He dissected more than 30 bodies of both genders and all ages - just to gain knowledge of what lies beneath the surface. Gruesome type of reference producing, if you ask me, but a Master had to do what he had to do! And I am eternally grateful to have the luxury of having anatomy books on the shelf at my convenience, and not have to visit dark and dumpy crypts to slice and dice dead bodies next to a flickering candle light.
Hungarian painter Mihaly Munkacsy created oil sketches during the preparatory stage; hiring real models, posing them and producing many studies that he later used for the final painting. He basically painted his own reference pictures.
What about landscape painters, who go out to the field and ‘copy’ what is in front of them? Norman Rockwell used photographs as reference for his work when black and white photography appeared on scene.
So all these masters are cheaters? Not under any circumstances! Just ignore the ignorants.
Multiple ways to access references;
1 - Shoot your own; fastest and the safest way as you own the rights. Pose yourself, or ask a family/friend to help you out, build mini scenes from paper or clay. When you go out, photo textures (concrete, sand, bark - anything!), clouds, buildings in perspective, look for compositions with scale, or interesting framing.
2 - Buy packages; many people are creating awesome pose references for artists. They usually offer samples for free. Always read their terms of usage.
Here are some really good sources;
https://www.artstation.com/grafit/store?tab=digital_product
https://www.deviantart.com/theposearchives/gallery
Pinterest and the internet as a whole;
As of lately these have become somewhat twisted and dropped in quality dramatically as they are littered with Robot Transmog Trash pictures. Watch out for the origins and sources when you collect inspiration.
Tips on how to use reference;
Don’t marry to the chosen picture; getting a whatever photo and painting it one on one is called a study, even if you are doing it in a different style. I would not consider it original artwork because you don’t create anything new. Avoid being a dime a dozen, boring copy machine, and design something original.
Use the image only as an inspiration; maybe a perspective of a particular photo makes your mind spark, and you think it would be perfect for your illustration. But you only use the perspective structure, nothing else. Add your own set design and story.
Think out of the box; you see an intriguing root pattern above the ground, and you have the superpower to turn it into a fantasy land with a whole ecosystem! Play with scale and let your imagination run wild. Everything can be something else.
Photo-sketching
This is an industry standard method, and it is what it is. Here is an entire video about photo-concepting by Feng Zhu. https://www.youtube.com/watch?v=9sTJu_fSpVs
Sketchup, Blender and other 3D
If you want more accurate perspective and lighting for your art, learning 3D is a huge advance.
Sketchup Free is great and relatively easy to use; great for concepting architectural subjects, like rooms, isometric dissection and such.
https://www.sketchup.com/en/plans-and-pricing/sketchup-free
Sketchup Free workshop from Justin Geis; https://www.youtube.com/watch?v=Mk3IhXD4e5o&list=PLEQT0qjXe6zgCl0ITWmUg5OuG7Zjzf38F
More examples how it works in practice from FZD School; https://fzdschool.com/blog_posts/visual-storytelling-through-set-design
Blender basics from Grant Abbit;
https://www.youtube.com/watch?v=lLqep5Q4MiI
Great workshops on greybox method from Trent Kaniuga; https://trentk.gumroad.com/l/tJFll?layout=profile https://trentk.gumroad.com/l/YYksv?layout=profile
Pose tool 3D and Handy applications
Pose tool 3D - great application for roughly posing your character and setting up some lighting. It is not 100% accurate but I use it only as a guide. https://store.steampowered.com/app/1817300/Pose_Tool_3D_Pro/
Handy Art Tool - it is great for hands and head, to get right those funny angles. https://www.handyarttool.com/
I heard Daz3D is great for posing but I never used it. To me is one step too far being too artificial, I guess. But many use it, and all over it looks nice.
I don't mention programs like Maya, 3D Max and Zbrush - go for them if you have the resources and desire to incorporate them into your workflow, but there are more reasonably priced alternatives for a more humble crowd.
Other programs I use for visualisation or just for fun
MagicaVoxel
Very easy to use and fun to work with. Great alternative for building super basic greybox.
https://www.voxelmade.com/softwares/
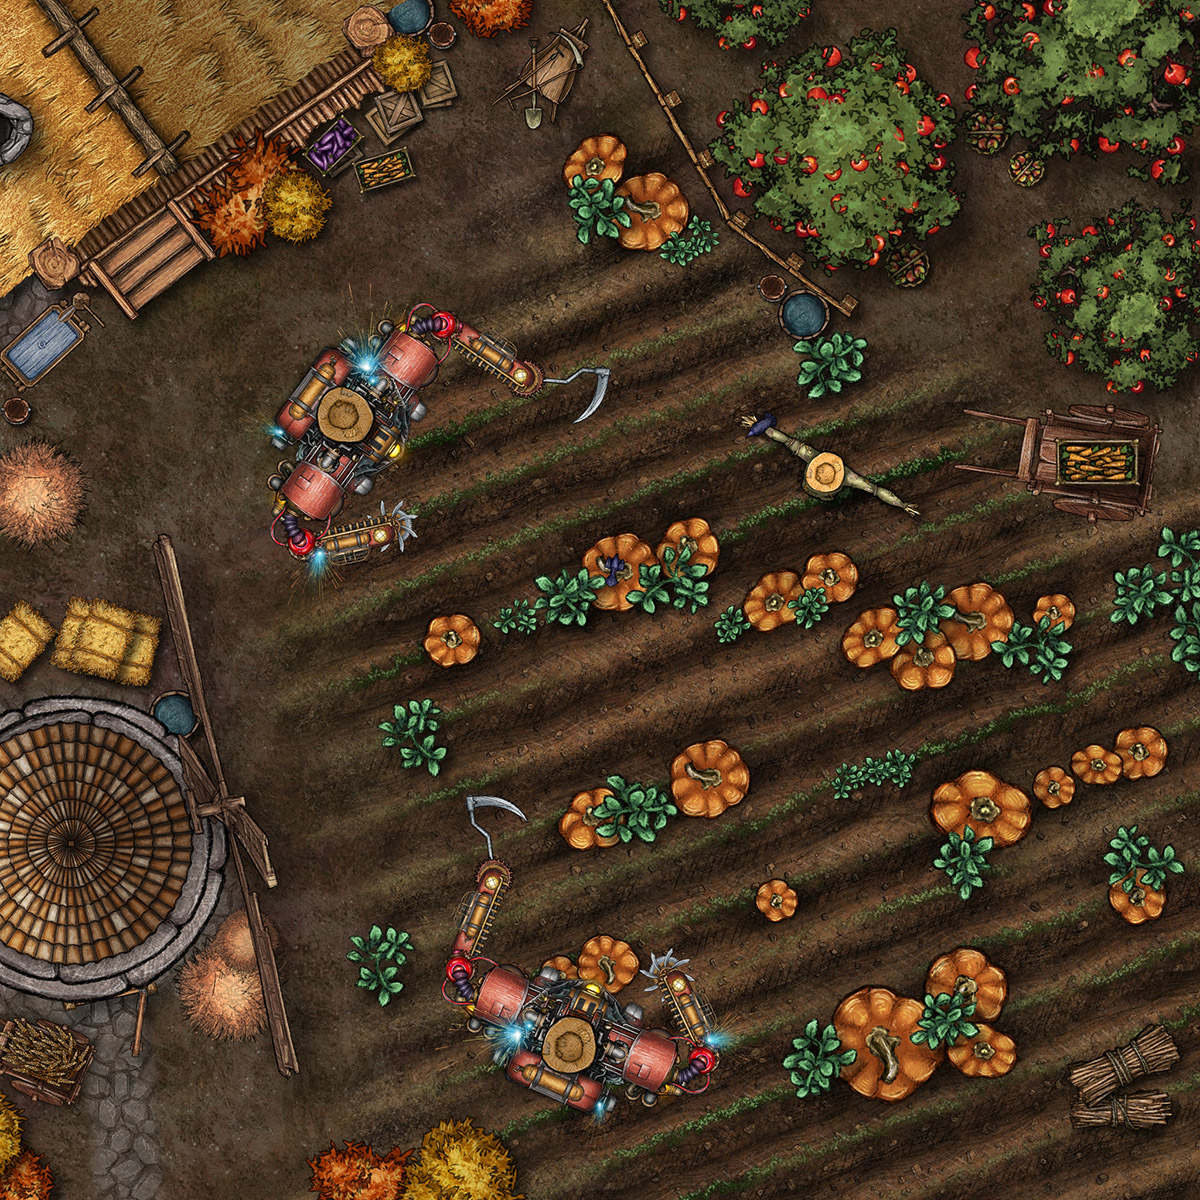
Inkarnate
Inkarnate is a map creator with pre-built assets, but not powered by AI. There is a free version and Pro version which is still affordable and grants you commercial license to your creations.
What am I using it for? Visualising the environment for my story, creating blueprints, layouts for buildings and world map.
I hope I was able to contribute to your armoury, but again; you have to be the master, tools are just tools.
Be Excelllent to Each Other!